

How to Check and Change Transmission Fluid

Maintaining the health of your vehicle’s transmission is crucial for its overall performance, and one of the key aspects of this maintenance is regularly checking and changing your transmission fluid. Transmission fluid plays a vital role in lubricating the moving parts of your transmission, cooling it down, and facilitating smooth gear shifts. Over time, however, this fluid can become contaminated or break down, leading to potential issues that can affect your vehicle’s functionality.
Knowing how to check the level and condition of your transmission fluid is an essential skill for any car owner. This task can help you identify problems early on and save you from costly repairs in the long run. Additionally, performing a fluid change at recommended intervals ensures optimal transmission performance, prolonging the life of one of the most important components of your vehicle.
This guide will walk you through the step-by-step process of checking and changing your transmission fluid, providing you with the necessary knowledge to keep your car running smoothly. By understanding these fundamental maintenance tasks, you can enhance your driving experience and maintain the reliability of your vehicle.
Identifying the Right Type of Transmission Fluid for Your Vehicle
Choosing the appropriate transmission fluid is crucial for the optimal performance and longevity of your vehicle. Using the wrong fluid can lead to severe damage and costly repairs. Here are the steps to identify the right type:
- Consult the Owner’s Manual: The owner’s manual contains vital information regarding the specific type of fluid recommended by the manufacturer. This should always be the first source of reference.
- Check Fluid Specifications: Transmission fluids are categorized by their specifications, including viscosity and additives. Look for details such as:
- Type: Automatic, manual, or CVT (continuously variable transmission).
- Viscosity rating, which is often indicated with a number, e.g., 5W-30.
- Additive package, which can enhance performance and protect against wear.
- Look for Manufacturer Recommendations: Many manufacturers produce their own transmission fluids, tailored specifically for their vehicles. Always consider using the recommended brand for the best results.
- Consider Climate and Driving Conditions: The location and typical conditions under which you drive can influence the best fluid choice. For more extreme temperatures, specific formulations may offer better performance.
Regular maintenance involving the correct transmission fluid not only enhances vehicle performance but also extends its lifespan. Ensuring compatibility with your vehicle’s system is essential for reliable operation.
Step-by-Step Guide to Checking Your Transmission Fluid Level
Checking your transmission fluid level is an essential part of vehicle maintenance that ensures smooth operation and longevity of your transmission system. Here’s a clear guide to help you accurately check the fluid level.
First, park your vehicle on a level surface and engage the parking brake. This step is crucial to get an accurate reading. Allow the engine to run for a few minutes to warm up the transmission fluid, as warmed fluid expands and provides a more accurate level.
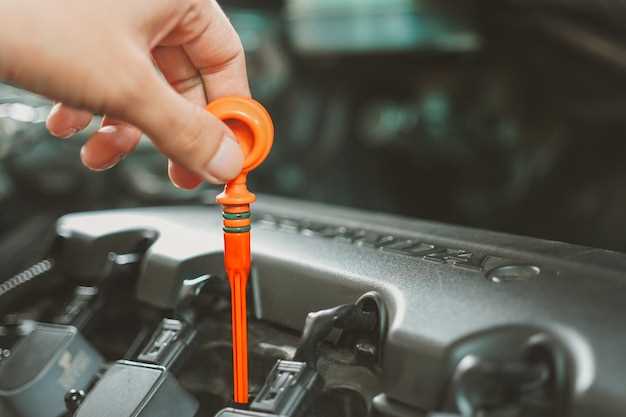
Next, locate the transmission dipstick, which is usually found near the back of the engine bay. The dipstick may be identified by a colored handle, often yellow or red. Make sure to pull the dipstick out slowly to avoid spills.
Wipe the dipstick clean with a lint-free cloth or paper towel to remove any residual fluid. Then, reinsert the dipstick completely back into its tube before pulling it out again to check the fluid level. This will provide a more accurate reading.
Examine the markings on the dipstick. There will typically be indicators showing “Full,” “Add,” or low levels. Ensure that the fluid level is within the optimal range indicated. If it’s below the recommended level, it is necessary to add the appropriate transmission fluid as specified in your owner’s manual.
If the fluid appears dirty or has a burnt smell, it may indicate the need for a fluid change rather than just a top-off. Regular maintenance checks can prevent costly repairs, so it is advisable to perform this check at regular intervals, such as every 30,000 miles or as recommended by your vehicle manufacturer.
Finally, after checking and adjusting your transmission fluid level, securely replace the dipstick to ensure nothing contaminates the system. Always remember to dispose of any used fluid responsibly if you choose to change it.
Procedure for Draining and Refilling Transmission Fluid Safely

To ensure the longevity and optimal performance of your vehicle’s transmission, it is essential to periodically check and replace the transmission fluid. This procedure can be performed at home with the right tools and precautions.
Step 1: Gather Necessary Tools
Before starting, collect the required tools: a wrench set, a transmission fluid pump or funnel, a drain pan, and new transmission fluid. Make sure to refer to your vehicle’s manual for the appropriate type of fluid.
Step 2: Prepare the Vehicle
Park the vehicle on a level surface and engage the parking brake. This ensures stability during the process. Allow the engine to run for a few minutes to warm up the fluid, as warm fluid drains more easily.
Step 3: Locate the Drain Plug
Identify the transmission drain plug, typically located at the bottom of the transmission pan. Clean the area around the plug to prevent debris from entering the system.
Step 4: Drain Old Fluid
Place the drain pan underneath the drain plug and carefully remove the plug with a wrench. Allow the old transmission fluid to completely drain into the pan. This may take several minutes. Once drained, replace the drain plug and tighten it securely.
Step 5: Add New Fluid
Using a funnel or transmission pump, add the new transmission fluid through the fill tube. Refer to the vehicle manual for the correct fluid capacity. Avoid overfilling, as this can cause issues with transmission performance.
Step 6: Check Fluid Level
Start the engine and let it run for a few minutes. With the vehicle still on a level surface, check the fluid level using the dipstick. If necessary, add more fluid to reach the recommended level.
Step 7: Dispose of Old Fluid Properly
Dispose of the drained transmission fluid responsibly. Many auto parts stores offer recycling services for used fluids.
By following these steps diligently, you can effectively drain and refill your transmission fluid, contributing to the health and efficiency of your vehicle’s transmission system.